

Want to start your own e-commerce website for FREE?
We all know that building an online store can be a difficult thought. Especially when you don’t have enough budget. Well, you’re not alone.
People often ask me this question in multiple ways.
“Can I create an e-commerce website without money?” or “Can I create an e-commerce store to sell unlimited products for free?“
The short & simple answer is “Yes”… You can!
In this tutorial post, I’ll give you the most comprehensive guide on how to create an e-commerce website or an Online Store for free (step by step). I will also be integrating the shipping and tracking system for my e-commerce website.
At the end of this tutorial, your free e-commerce site should be something similar to this…

Now you must be asking..
What can you sell with this Free E-commerce Store?
Well, starting from digital products like software, ebooks, Photographs to Physical products & service. From appointment booking to monthly subscriptions, you can literally sell anything you want.
So..
What Do You Need to Start a Free E-commerce Website?
Anyone with a computer & working internet connection can get started within a matter of minutes and without having prior knowledge about website development.
Three things you need to start an online store.
- A domain name (this will be the name of your online store i.e myonlinestore.com)
- A web hosting account (this is where your website lives on the internet)
- Your undivided attention for just 20 minutes.
Yes, it is really that simple.
You can create your own online store for free with WordPress in less than 20 minutes and I’ll walk you through each step of the process.
- What can you sell with this Free E-commerce Store?
- What Do You Need to Start a Free E-commerce Website?
- Step 1: FREE but the best E-commerce Website Platform
- Step 2: Register a Free Domain Name
- Step 3: Choosing a Free but the most reliable Web Hosting
- Step 4: How to point DNS to the server
- Step 5: Activate Free SSL Certificate
- Step:6 Installing WordPress
- Step 7: Install a free e-commerce theme
- Step 8: WooCommerce Configuration
- WooCommerce: How to add payment options
- WooCommerce: How to configure the Shipping System
- WooCommerce: Basic Set up
- Step: 9 Integrate Shipping & Tracking System
- Conclusion
Step 1: FREE but the best E-commerce Website Platform
The biggest mistake most entrepreneurs make is not choosing the right platform for their online store.
But Thankfully you are here, so you won’t be making that mistake.
There are two popular e-Commerce platforms that we recommend: Shopify or WordPress.
Both are great but there are few big difference between these two platforms.

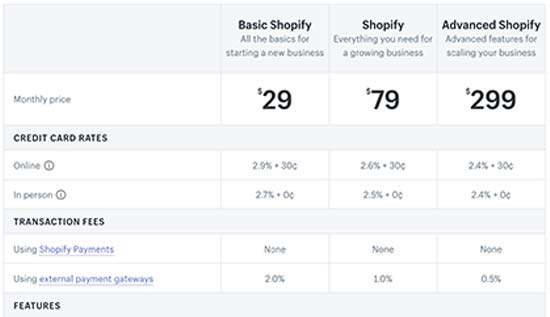
Shopify is a fully hosted e-commerce solution that starts at $29 / month. It’s a hassle-free solution where you just log in, choose your storefront design and start selling. The downside to Shopify is that it has limited store customization options compare to WordPress, and your payment options are also very limited unless you pay some additional fees.
It actually gets quite expensive for a startup company.
On the other hand, WordPress.
Most users choose WordPress, and we recommend because of its flexibility. It does require some manual setup, but it’s worth going for it in the long run.
In this tutorial, I will walk you through a step by step guide on how to set up an e-commerce website in WordPress using WooCommerce.
To set up your store, you need to have a domain name, web hosting, and an SSL certificate.
Step 2: Register a Free Domain Name
A domain name is your website’s address on the internet. It is what users will type in their browsers to reach your website ( for example our domain name is ithinklogistics.com ).
I would recommend buying a domain name from any domain name registrar like Godaddy.com, Crazydomains.in, enom.com or namecheap.com, etc. You can also register a domain from domains.google.com
The cost of registering a domain is approximately $7 to $8 (USD) or ₹600 to ₹900 Indian rupees. But if you really need a domain for absolutely NO COST then, you might wanna visit these free domain provider.
1. www.Freenom.com
2. www.Dot.tk
For this tutorial, I’ll be registering a free domain from Freenom.com
Here is how.
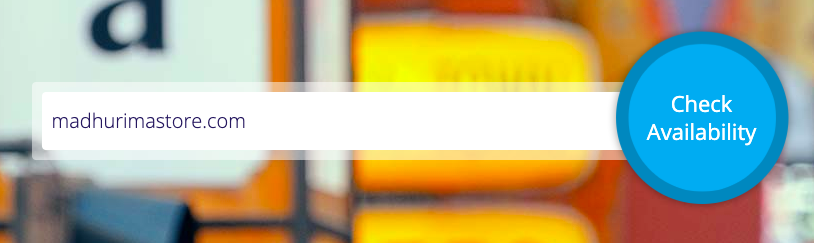
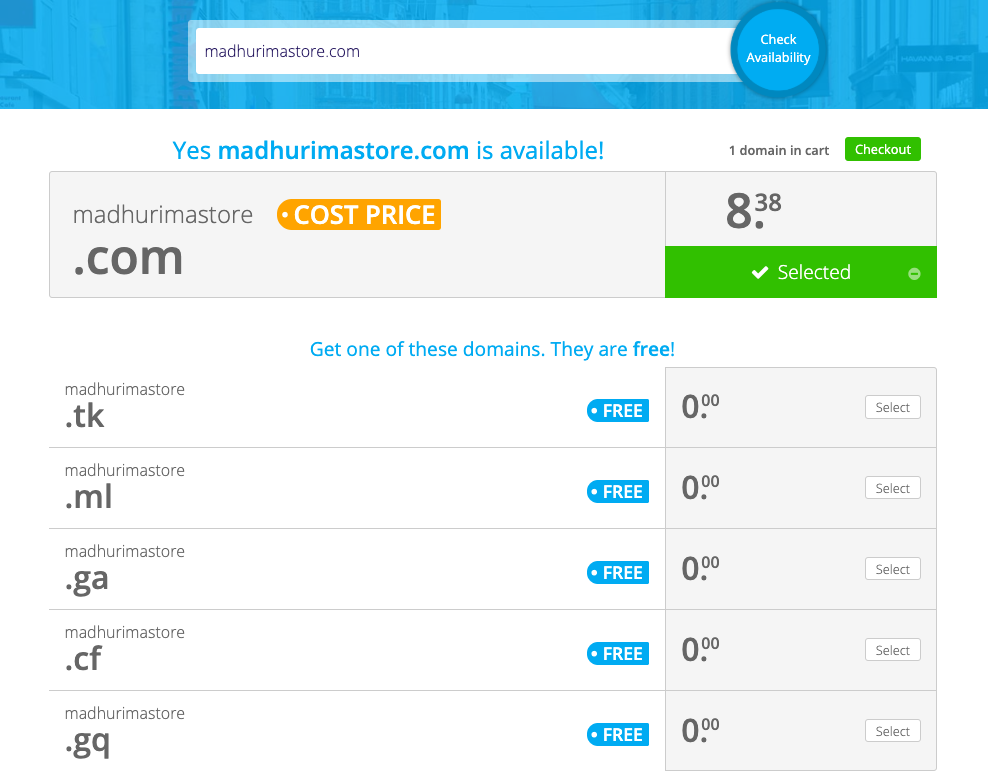
Go to Freenom.com & search your domain name. Just like I did.
Now choose from available free domain extension ( for example: .tk, .ml, .ga etc ).
Once you choose the domain extension you need to sign in with Google or Facebook, alternatively, you can verify your account with your email address.
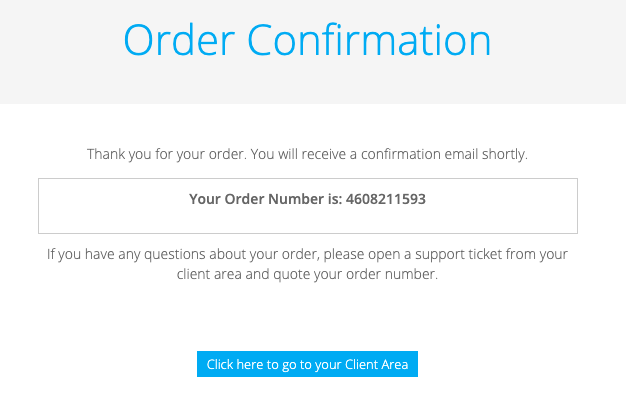
Once you submit your email address you’ll get a verification link to your inbox. Just click on the verification link you’ll be redirected to a form where you can submit your personal information & complete your order.
That’s it. Submit the correct information & you’ll see an order confirmation page just like this..
Step 3: Choosing a Free but the most reliable Web Hosting
Most of the time I see people search for “Free” or “Cheap web hosting company”, & that’s the biggest mistake they are doing.
You have to understand that web hosting is the heart of your Website. With Free or very cheap Web hosting you might face multiple issues with Downtime, Slow website, No technical support & unrestricted cPanel access.
This is why I would recommend getting a Web hosting plan from a reliable Hosting company like UltaHost , Siteground, Bluehost, Digital Ocean etc.
But nowadays, you can also get a good Web hosting for FREE.
Here are some reliable Web hosting company that provides limited Web hosting plan for FREE.
1. 000WebHost.com
2. googiehost.com
3. backlinkmedius.com
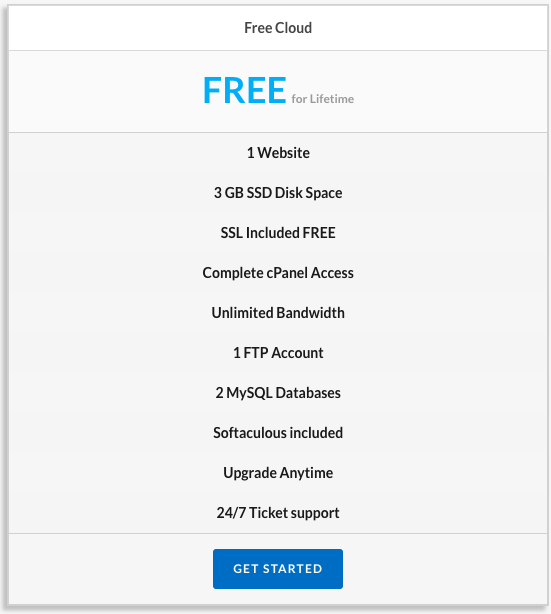
For this tutorial, I’ll be using Backlink Medius, as I think they are the most reliable hosting company among this free hosting list. Even this is the first reseller Web hosting company that offers Free 3 GB SSD disk space, cPanel, SSL & premium features like CloudFlare w/Railgun.
Here is how you get the Free Web Hosting plan from Backlink Medius.
1. Go to www.BacklinkMedius.com
2. Under the ‘Hosting’ menu, click on Free Cloud plan
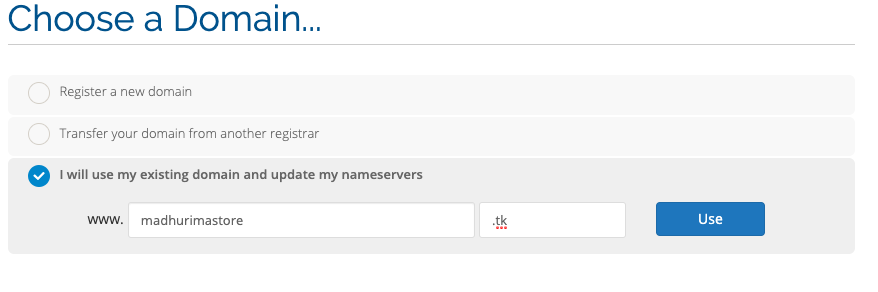
3. Now click on ‘Get Started’ & Check on “I will use my existing domain and update my nameservers“, now type your already registered domain & click “Use“.
4. Complete the registration process as per given instructions.

5. Once you are done with the verification, check your email inbox for the ‘Account verification link’
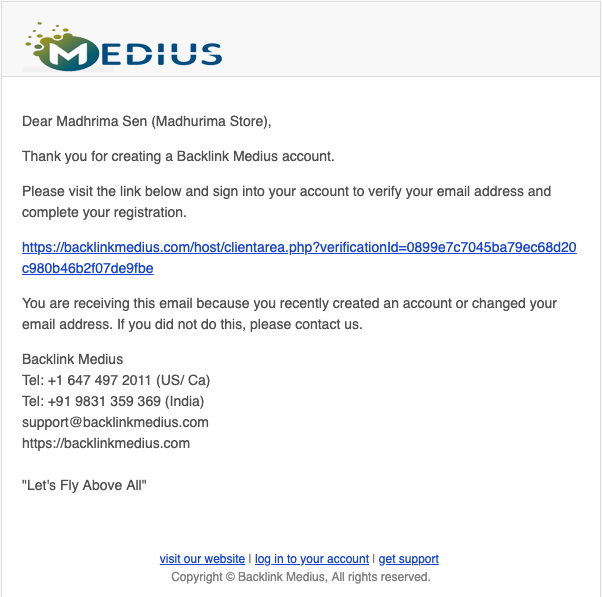
6. Click on the verification link, it’ll take you to the client login page of Backlink Medius.
Just log in to your account & you are done.
Step 4: How to point DNS to the server
As you already have got your Web hosting & Domain name registered. Now, it’s time to point the DNS to the Hosting server. Normally, if you have your domain & hosting from the same provider ( e.g Backlink Medius, Godaddy, etc ), it’s automatically pointed to your hosting account and no further actions are required.
But for this tutorial, we’ve used two different companies to register our domain & hosting.
There are 2 ways you can point DNS to the hosting server.
1. By changing the nameservers at your domain name registrar. This method is recommended since your DNS zone will be configured automatically. By pointing the domain name to Backlink Medius nameservers, you’ll be able to administrate the DNS zone at Backlink Medius’s control panel.
2. By pointing the domain name via A record. This method requires more technical knowledge since you’ll have to manually change the DNS records. Moreover, your DNS zone won’t be automatically updated.
To keep everything easy & simple, I’ll change the nameservers at our domain name registrar.
Here is how it’s done,
1. Log in to the domain account with the same Email ID I’ve registered with Freenom.com
2. Click on “Services” & select “My domain” from the Menu dropdown.
3. Once you see your registered domain, just click on “Manage”
4. Click on “Management tools” & select “Nameservers” from the dropdown
5. Now instead of Click on “Use custom nameservers”
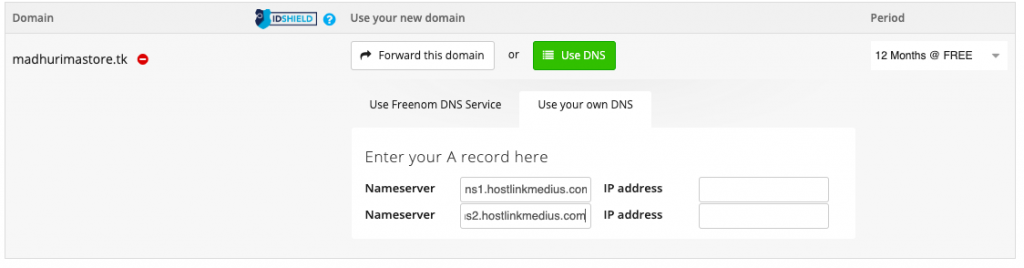
6. Type your Name server ( For me it’s ns1.hostlinkmedius.com & ns2.hostlinkmedius.com ) & click on “Change nameservers”
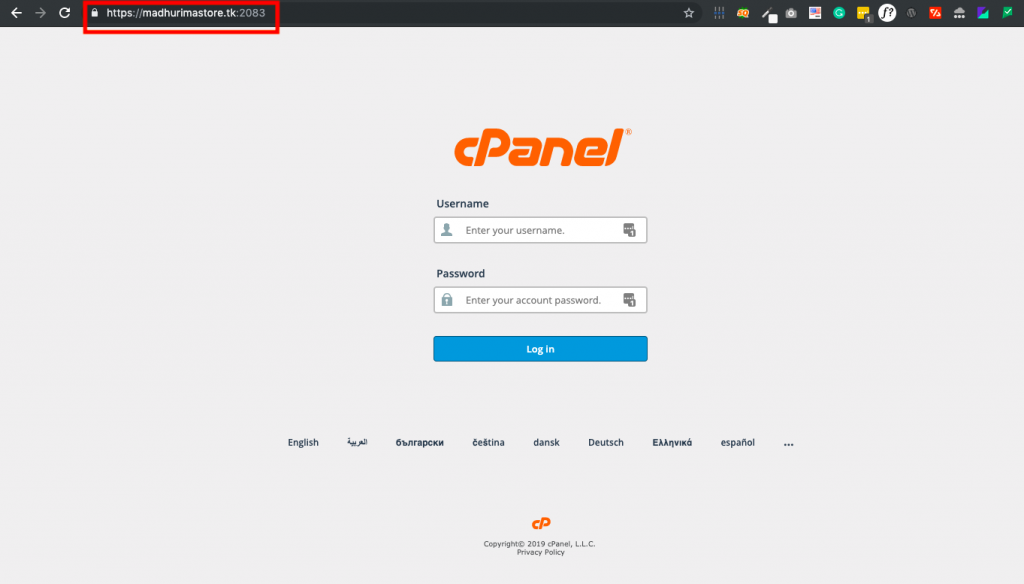
Now, a DNS change requires up to 72 hours to propagate worldwide, although most often this happens in a matter of 10-15 minutes.
Once the DNS has been propagated, you’ll be able to login to your cPanel by typing yourdomain.com:2083 or yourdomain.com/cPanel.
Now that we’ve already done with our basic setup. it’s time to activate the Free SSL.
Step 5: Activate Free SSL Certificate
There are multiple ways you can install a free SSL. But in this tutorial, I’m going to show you the easiest way to start.
First, you need to Log in to your cPanel. There are 2 ways you can do that.
1. Just put yourdomain.com/cpanel ( For me it’s madhurimastore.tk/cPanel )
2. Type the correct user name & password to log in
Or, you can access your cPanel through your Client area by following these 4 steps.
1. You need to simply log in to your client area or Web hosting account by clicking on the Sign-in option.
2. Once you are in, you’ll see your activated services in your client area.
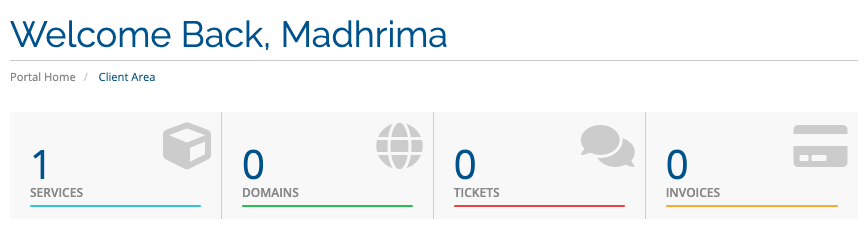
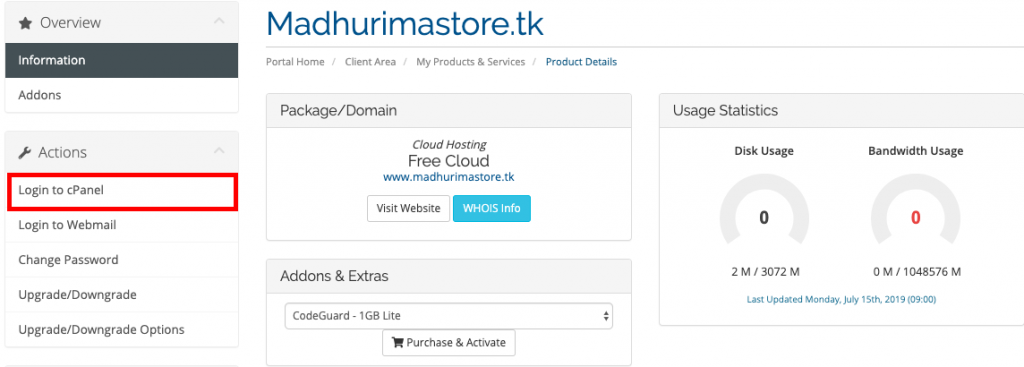
3. Just click on services & then click on your hosting plan ( For me it’s Free Cloud )

4. Now on the left sidebar, click on cPanel under ‘Action menu’. You’ll be automatically redirected & logged in to your cPanel.
Once you access your cPanel, the first thing we need to do is activating the free SSL certificates. To do that.
1. Search “SSL” in the search box.
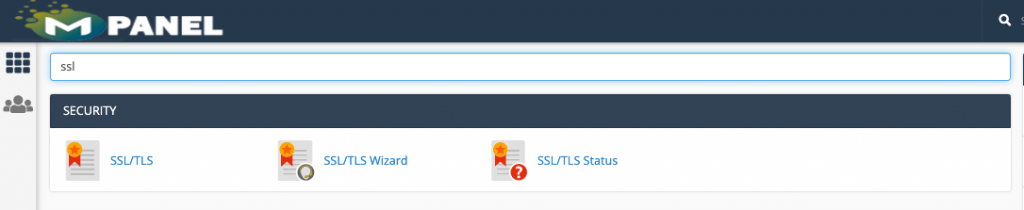
2. Click on SSL / TLS Status
3. Check all domains & click on Run Auto SSL (The availability of this option depends on your Hosting provider)
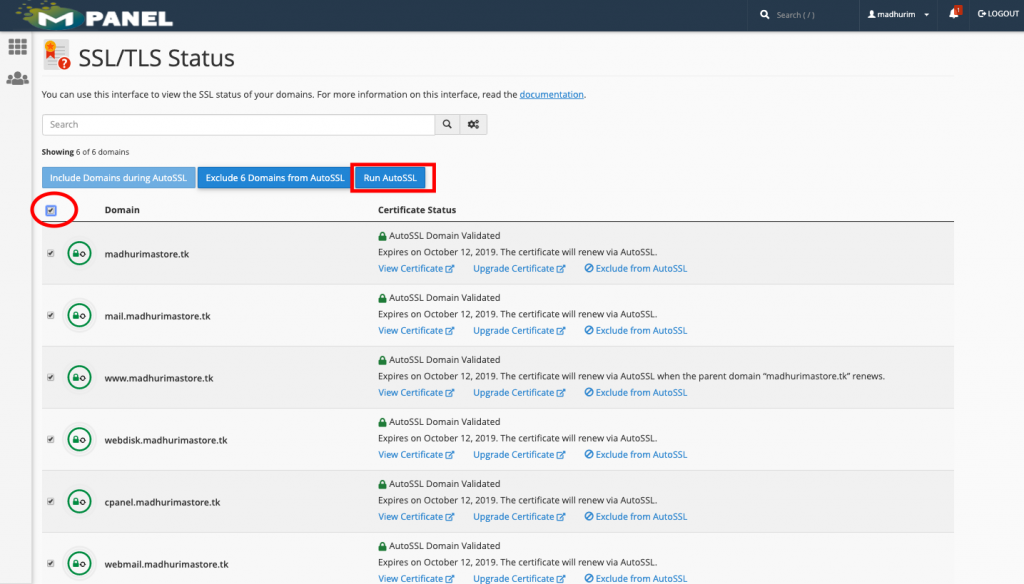
4. Once the SSL has been activated you’ll see the status as “AutoSSL Domain Validated”
& that’s it.
Step:6 Installing WordPress
After activating the SSL Certificate, go back to your cPanel dashboard. Now we’ll be installing WordPress with the help of Softaculous App installer.
1. On the cPanel, scroll down a bit & look for “SOFTACULOUS APPS INSTALLER” section.
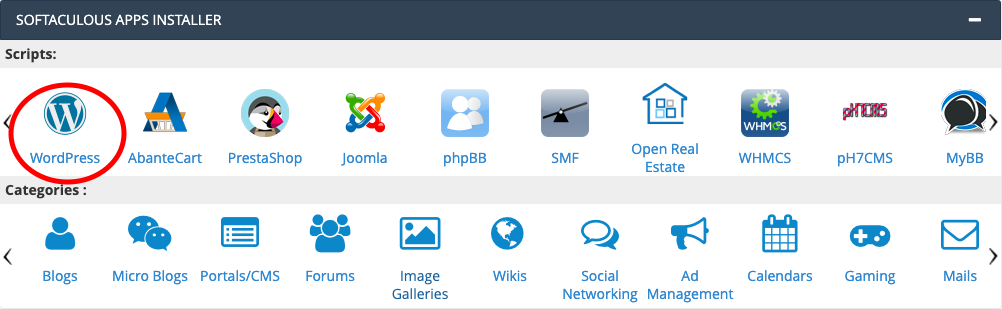
From this app installer, we can actually choose & install any Content Management System like WordPress, Joomla, Prestashop, etc with just a click.
For this tutorial, we’ll be installing WordPress. Here is how it works..
2. Just click on the WordPress logo as shown in the picture.
3. Now on the WordPress installer panel, click install
4. Now leave everything as it is. Make the “Directory” section blank if you want to install WordPress in your root domain ( for me it’s madhurimastore.tk )
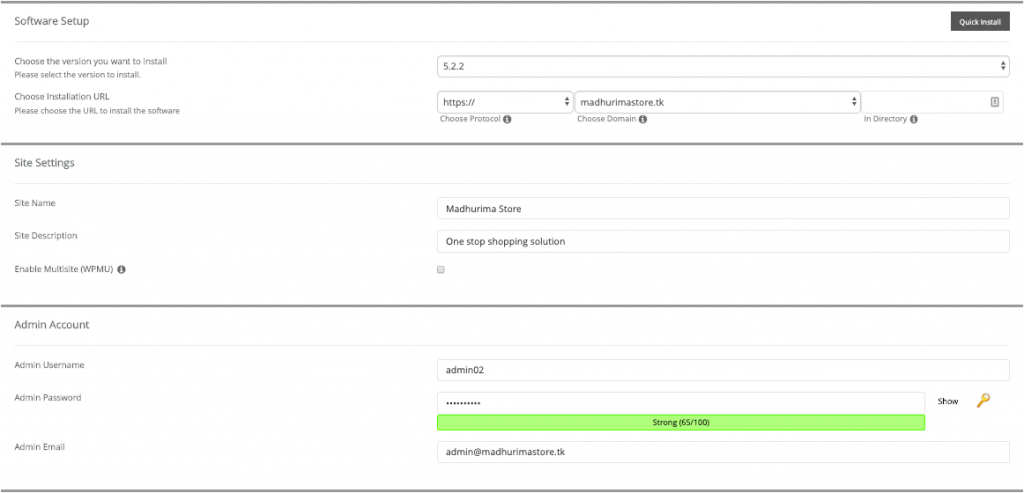
5. Put a site name, description, a strong Admin user name, a strong password & your email ID.
6. Now scroll down to the bottom & click install
The installation process could take up to 4 minutes depending on the server response.
Once the installation process has been completed, you’ll be redirected to this Congratulation page.
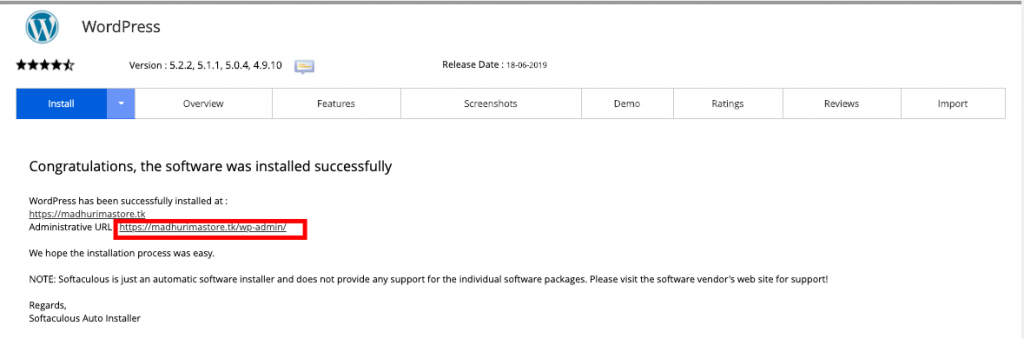
Here you’ll see the WordPress login link ( for me it’s https://madhurimastore.tk/wp-admin )
7. Click on the log in link, or open a new tab, type your yourdomainname/wp-admin to log in to your WordPress dashboard.
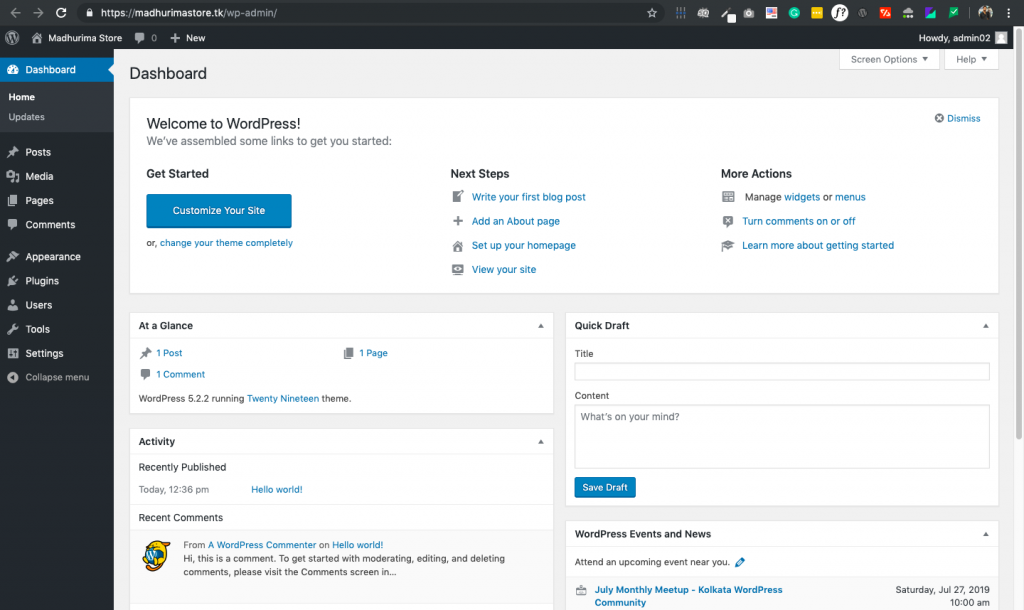
It’ll look like this…
Now, to design a Free e-commerce website, we need to install a free WordPress theme from the WordPress repository.
Step 7: Install a free e-commerce theme
To install a free theme, you need to find the Appearance section, which is on the left sidebar of your WordPress dashboard.
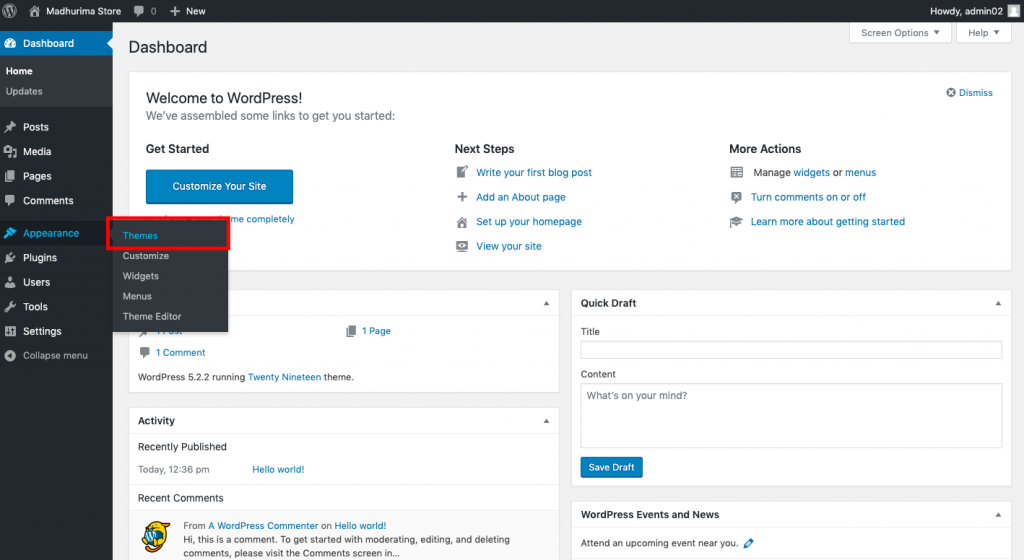
1. hover over the Appearance section & click on Themes.
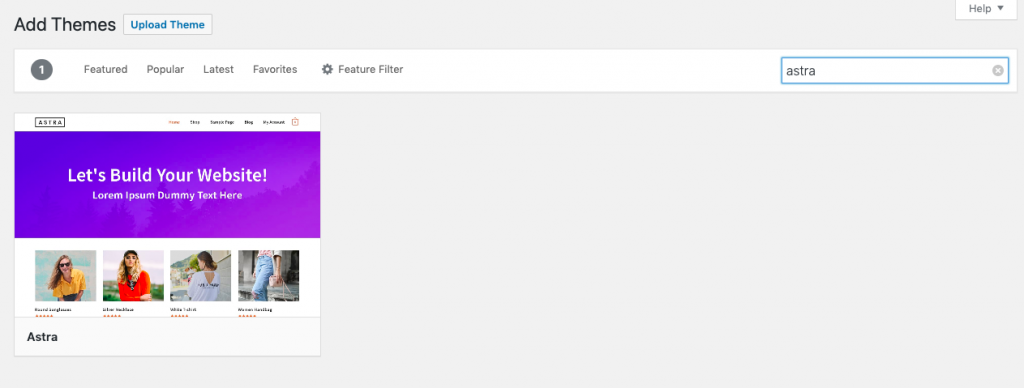
2. You’ll see some basic WordPress theme installed.
3. Click on “Add New” & Search for “Astra” ( you can always choose a different theme or even you can buy premium themes like “Flatsome” from ThemeForest. But for this tutorial I’m gonna be using this Free e-commerce theme. )
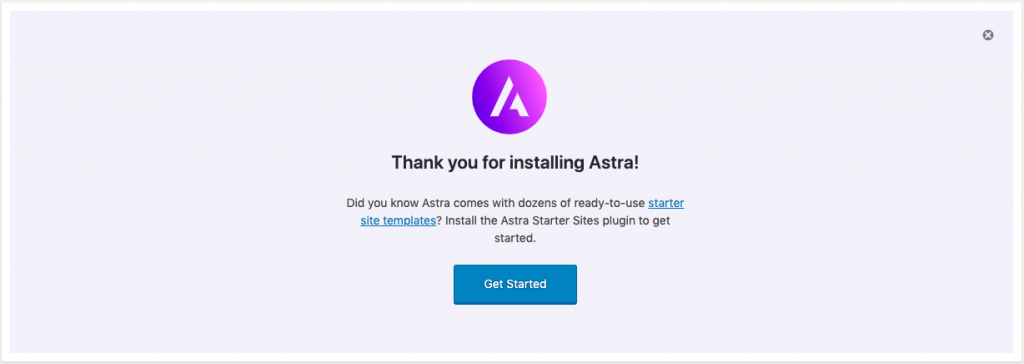
4. hover over the Astra theme & click on install, this will install the free e-commerce theme.
5. Once the theme has been installed, click Activate
6. Once you activate the theme it’ll ask you to install & activate the required plugins.
7. Click on Get Started
8. On this page, you’ll be asked to select a page builder you would like to use with this website.
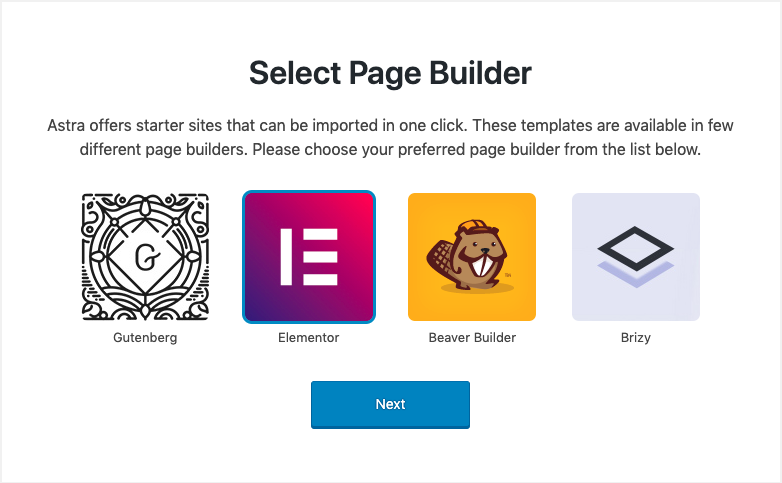
For this tutorial, I’ll be using free Elementor page builder because it is the easiest & flexible page builder for WordPress.
9. Just select Elementor & click on Next
10. Now you’ll be able to choose a Free design from a 100+ premade templates of Astra template library

11. For this tutorial, we’ll be installing a template called “Brand store”.
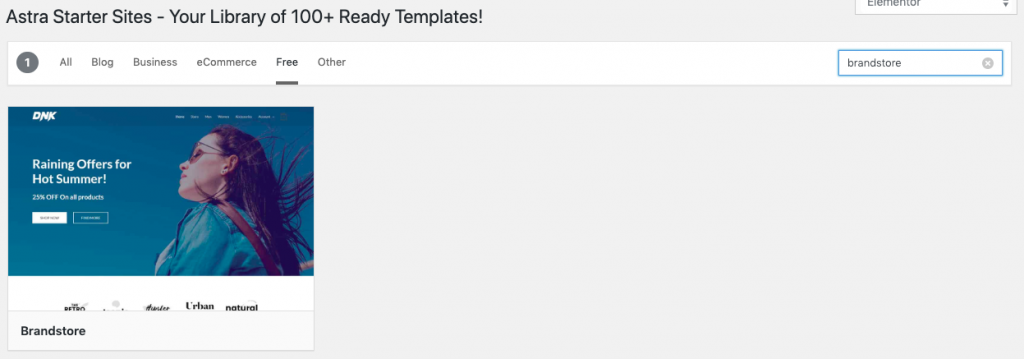
12. Just click on Preview. You’ll exactly see how the website gonna looks like.
13. On the Preview mode, click on import site
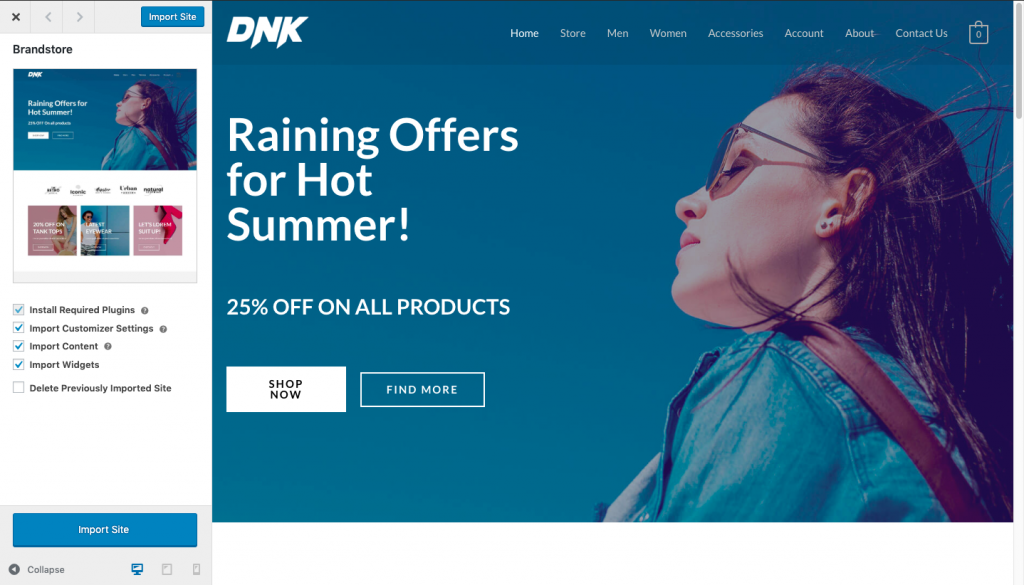
This importing process might take up to 10 minutes depending on your server speed.
After successfully importing the template, once you see this dialogue, just click on “VISIT SITE”

& that’s it. Congratulations! We’ve successfully created an E-commerce Website for free.
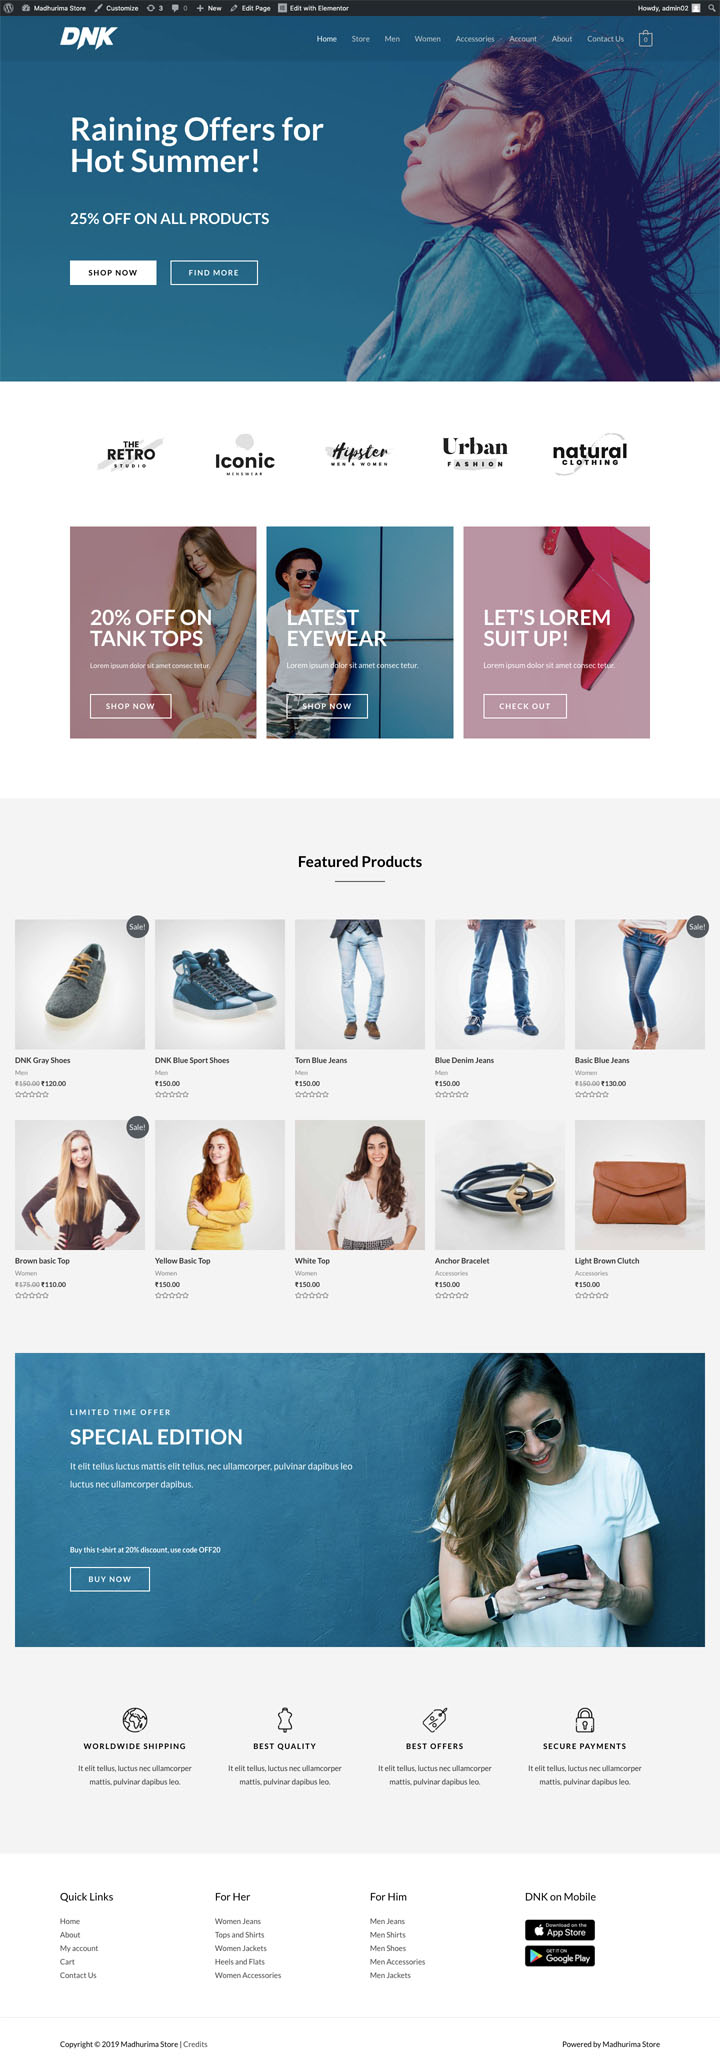
Now, just click on View site to see our free e-commerce store.
It’ll look like this.
Once we see the store is ready, it’s time to configure the WooCommerce plugin, which was automatically installed with the theme.
Step 8: WooCommerce Configuration
Now, it’s time to configure the WooCommerce, integrating the payment system & setup those e-commerce functions that we see on most of the e-commerce websites.
1. At first, to go back to your WordPress Dashboard, hover over your site name & click on Dashboard
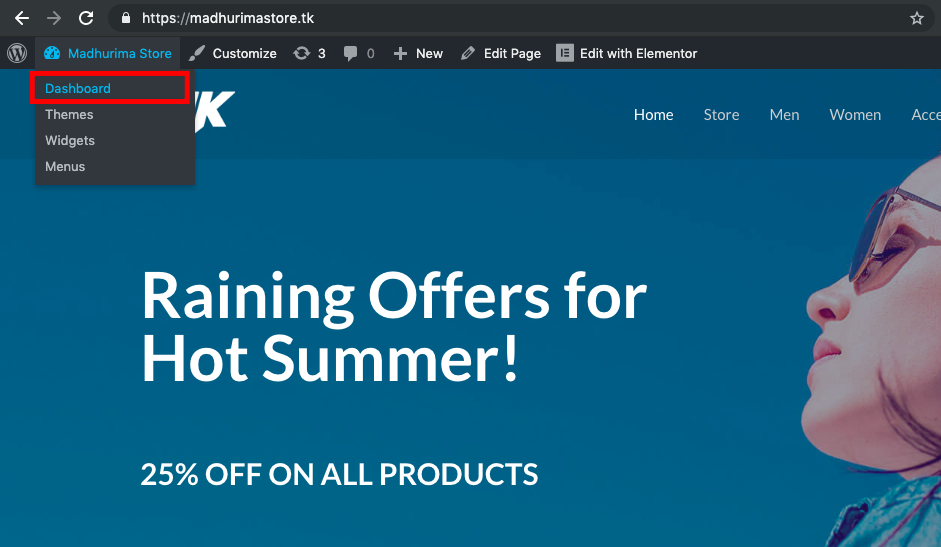
at left sidebar hover over on WooCommerce & click on Settings.
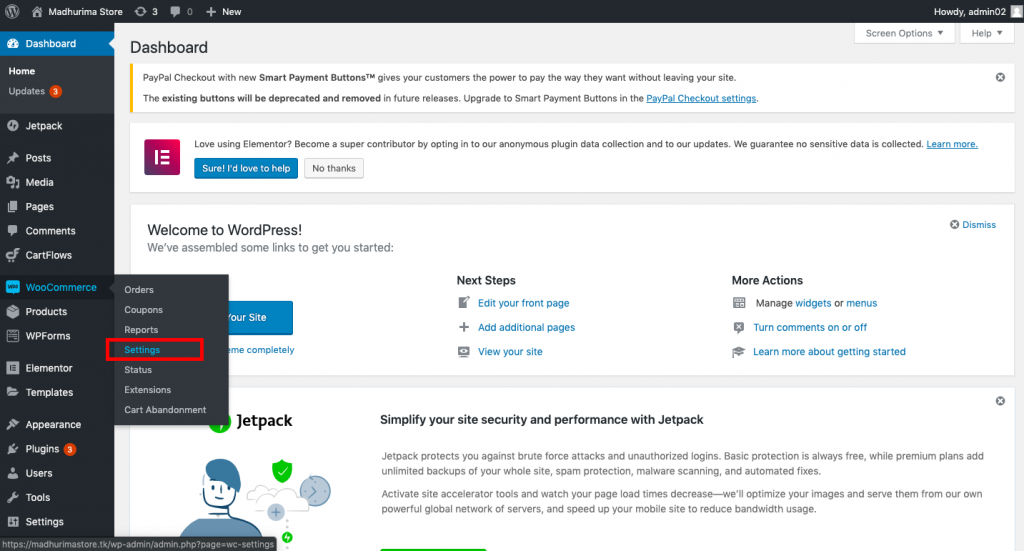
2. Once you click on the settings, at the top you’ll see a “Run Setup Wizard” button. Click on that.

3. In the setup panel fillup your store information without doing any mistake. You can always sale physical & digital products with WooCommerce. But in this tutorial, I’m going to show you, how you can sell physical products from your free e-commerce store.
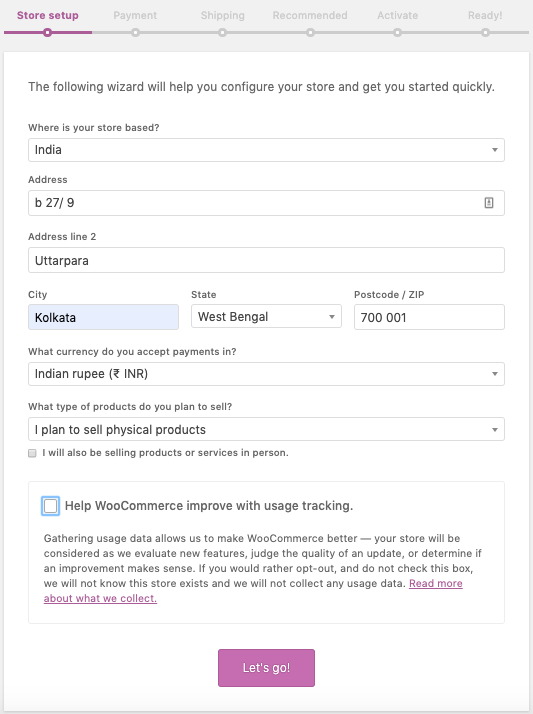
4. After filling up the details, click on “Lets Go”
WooCommerce: How to add payment options
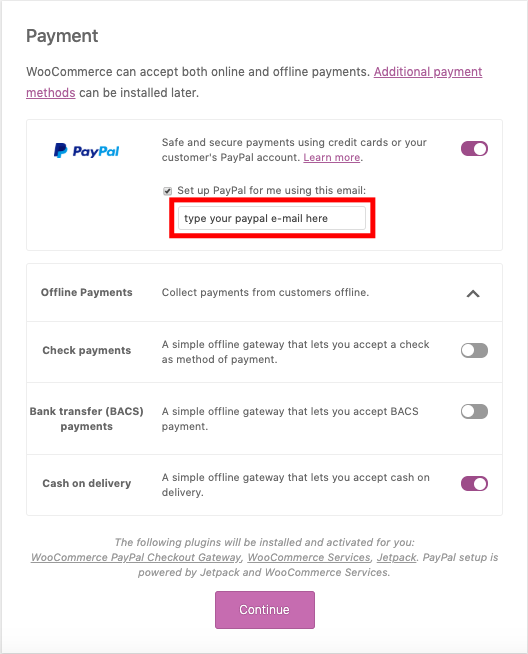
You can always set up your payment options from the backend. For that, Hover over on WooCommerce > Sttings > Click on ‘Payment’ tab.
Or you can set up payment options from this “Setup wizard”
WooCommerce: How to configure the Shipping System
On the ‘setup wizard’ you can add Shipping zone & shipping charges.
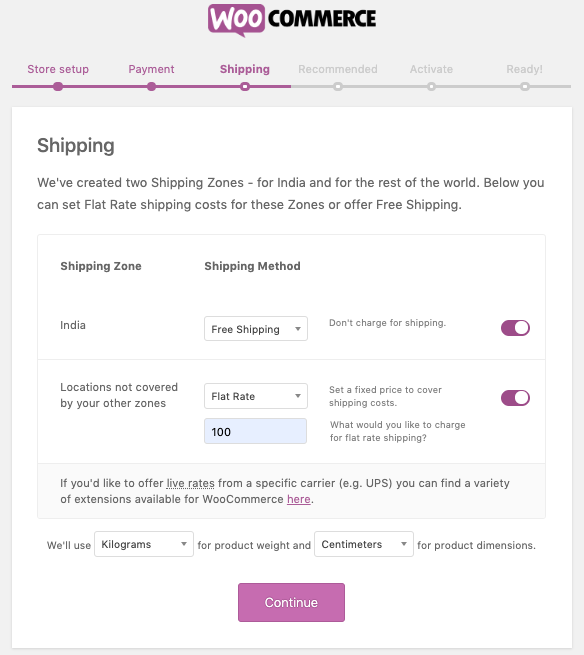
For more shipping options & configurations, you can watch this tutorial by WpTuts
WooCommerce: Basic Set up
After configuring the Shipping system, you can skip these 3 steps which you can configure later.

Step: 9 Integrate Shipping & Tracking System
Finally, it’s time to integrate the shipping & tracking API’s. This will give you & your customer a simple & hassle-free e-commerce experience.
Now, to integrate the iThink Logistics shipping system. You don’t have to do anything. We have our inhouse IT team to take care of it. You just need to signup for a free account. Our representative will call you to verify & setup the shipping & tracking system.

Conclusion
And that’s how you can create a professional-looking e-commerce website for free.
In my next tutorial, I’ll teach you how you completely customize your e-commerce store with this Free Page Builder Elementor.
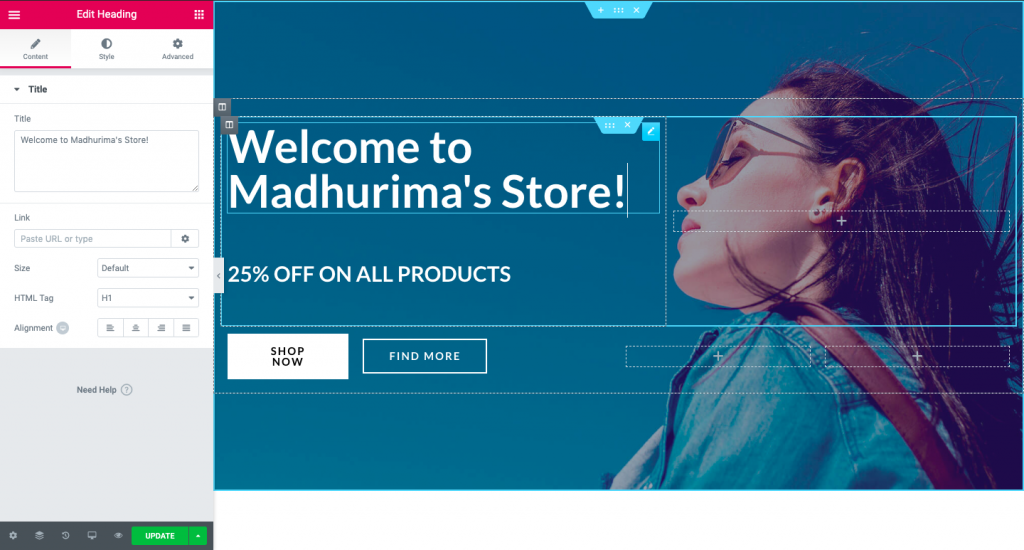
Here is just an example of the Elementor inline page editor
Let me know if you have any question regarding setting up this free e-commerce website.
I’m also curious to know, have you ever tried to design an e-commerce website for free? or you have paid huge money for a free WooCommerce theme.
Don’t forget to leave your comment below.
Thanks for reading.

: Meaning, Formula, and How It Works")


Leave a Reply